Climbing Mount Kilimanjaro is a physical undertaking, so you should prepare yourself to do little exercise at home. Being in good shape is important in many respects. Obviously, strong, conditioned legs make it easier to walk uphill and downhill for sustained periods of time. General aerobic fitness allows the body to function efficiently with less oxygen. And a fit body is more likely to withstand the stress of consecutive days of hiking and camping. Finally, a positive mental attitude can work wonders for you when fatigue and doubts arise. 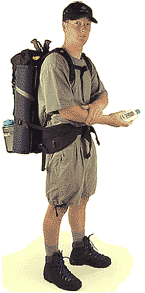
The best exercise we recommend for you to do is (Hiking, Gym, or Walk) that is what you will be doing on the mountain. Ideally, you should try to hike as much as possible on hills or mountains to stimulate ascension on Mount Kilimanjaro. Doing day hikes is superb training. For those who do not have access to trails, but have membership to a gym, you can train very productively on a stair master machine. If you have no access to trails or a gym, then try to walk as much as you can, with extended walks on the weekends.
The length of start training for Climbing Kilimanjaro we recommend at least two months prior to your departure.If you’ve never hiked before, you should start with shorter time intervals, a slower pace, and no weight (in your day pack) and then gradually increase all of the above as your fitness level improves. Your longest/hardest workouts should be performed two to four weeks before your departure. For the last two weeks, you should taper off your training and in the final days, rest so that your body has time to recover before your actual climb.
Climbing Tips& Advice
Remember that you will be on the mountain for at least 6 or 8 days. You need to take enough clothing, especially socks to last for this period. Due to frequent rainfall as well as numerous streams on the routes, it is advisable to pack items individually in your bag. These individually packed items should be wrapped in plastic bags to prevent them from getting wet in case of rain or of being accidentally dropped in a stream.
Packing List: 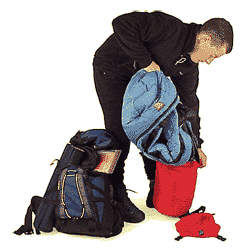
- Pack light but for all seasons/conditions. You go through 5 temperate climates in just a few days. Be prepared for that.
- LAYERS LAYERSLAYERS – Lots of layers and things you can re-wear.
- NO COTTON – it is said that it doesn’t dry at high altitude and you don’t want to chafe. Stick with breathable and moisture wicking fabrics.
- Pack one complete hiking outfit on the plane, including a long sleeve shirt, hiking pants, underwear, socks, and hiking boots. You can rent nearly everything but you don’t want to risk blisters ruining your whole climb.
- Be selective in what you take with you. The less you have to carry the easier your hike it and the porters are limited to what they can carry for you.
- Be prepared to not shower for a week, to take wet wipe baths and to squat behind rocks. Don’t worry. All the cool kids are doing it.
- It gets cold on the first night.
- Be prepared to wear the same thing day in and out. The air is thin and cold so you don’t (or probably won’t) sweat or stink like you normally would after a week without a shower.
- Get a camera that is small and fits in your hip pockets of the backpack. You want easy access and don’t want to carry it or have to take off the daypack to take pictures.
- The easiest way to keep going is to not look too far ahead. Do take in scenery but focus on one step at a time. It can be mentally exhausting to see the camp site ahead but know it is still 4 hours away. Be like the elephants and watch the feet of the person in front of you. Before you know it, you’ll reach your destination.
- Get a toilet tent. It is worth every penny – especially if you are a woman.
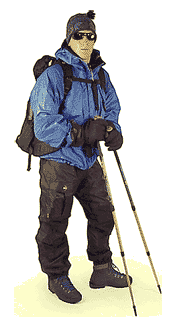
- Save your iPod battery for summit night. Music makes it SO much easier.
- Special for Ladies- Do you wear contacts? Do not worry about this, no problem with the clean water we provide on mount.
- Special for Ladies- On mountain putting yourhair in pig-tail braids help to keep it cleaner and easier to maintain for 7 days sans shower.
- Before you leave home make sure you can layer and wear all your clothes on top of each other: Don’t buy all small sizes and then get to the mountain and realize you can’t layer them. Big Uh Oh.
- Don’t carry any water on the outside during summit night. It will freeze. Protect it somehow. (Insulation or clothing.)
USEFUL Climbs’ EQUIPMENT FOR RENT 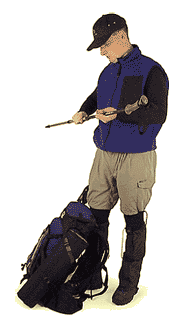
- Insulated Down Parka
- Walking Poles
- Warm thick winter Gloves
- Gaiters
- Balaclava
- Toilet Tent (DO THIS. IT IS WORTH YOUR MONEY!)
- Sleeping pad
- Duffel bag
NOTE: It is recommended that trekkers bring their own personal sleeping bag as bags available may not be warm enough. A four season’s sleeping bag is recommended.
SLEEPING AND CARRYING EQUIPMENT
- Medium sized daypack (25-30 Liters) *to carry only the things you need during the day like clothes, water, raincoat, warm clothing, camera and food.
- Daypack rain shield cover- To protect from soaking your belongings.
- Sleeping bag liner.
- Dry Sacks – or plastic bags to protect equipment from rain. i.e4 L, 8L, 16L and 32 L Sea to Summit bags to stay organized.
DRINKING
- Camelback 32 or water bottle
- Platypus Water Bag – Perfect and ideal so you don’t have to stop to drink.
- Water filtering iodine chemical tablets.
BASE LAYERS
- NO COTTON. Wear fabric this is breathable, synthetic and moisture wicking.
- Moisture wicking long sleeve tee-shirts (2)
- Moisture wicking tee-shirts (2)
- Moisture wicking sports bra tank (1)
- Moisture wicking sports bra (1)
- Long underwear pants (1)
- Underwear
MIDDLE LAYERS
 Fleece windwall jacket
 - Mid-weight moisture wicking smart wool long sleeve shirt
- Sweatshirt just for sleeping – (optional).
OUTER LAYERS
- Waterproof hard shell jacket with hood – breathable and water-resistant.
- Fleece pants (1) – Only wear these at summit night over long underwear and under your waterproof pants
- Hiking pants (with zippers to turn into shorts) (1)
- Waterproof pants (1)
- Gloves or mittens – warm, waterproof recommended
- Medium gloves. Something warmer than glove liners but not as heavy as summit gloves for daily hiking.
- Glove liners – thin and synthetic, to be worn under gloves for added warm and protection from frostbite
- Knit hat
- Balaclava
- Sun hat with brim or Bandana
FOOTWEAR
- Ankle high supportive hiking boots
- Shoes for lounging around camp. You’ll want to give your feet a break. Use Keensbecause are easy to slip on over socks. (Also – bring a bag to keep your dirty camp shoes in)
- Hiking socks 3 pairs (Smartwool suggested)
- Sock liners- 2 pairs Thin, synthetic and one size smaller. They stretch and then cause blisters.
MISC. & PERSONAL
- Toiletries -(soap, tooth brush, toilet articles, tooth paste etc.)
- Sun screen
- Bug spray- deet 25-50%
- Toilet paper (you can buy travel rolls from Target or take the cardboard out of a roll and put in plastic zip lock bag)
- Headlamp and batteries
- Sunglasses – UV protection
- Camera
- Extra memory card
- Extra batteries for camera & headlamp (leave extra batteries in a pair of socks to keep warm.)Batteries don’t do well in the cold and high altitude. Also, check the camera specs before you go to be prepared. You don’t want to have a surprise when you get to the top as you probably won’t want to climb to the summit again just to get that snapshot.
- High energy snacks – trail mix, cliff bars, chocolate bars.
- Vagina wipes
- Wet wipes for hygiene and cleaning – more than you think you need. then add more. You don’t need expensive camping brand. $1.99 Wet Ones from Target will work.
- Cotton Q-tips
- Anti-itch cream for bug bites. FYI the mosquitoes are enormous!
- iPod- but save your battery for summit night.
- Small unbreakable travel mirror
- Face Wash – I found it easiest to use Neutragena Face Wipes
- Quick Dry Towel (optional)
- Plastic bag for trash – You cannot leave anything on the mountain but the porters can collect the trash for you
- Sun screen and lip protection, SPF 30+
- Ziploc bags, to protect camera, binoculars, etc. from dust
- Contact solution & case
- Journal and pen *It goes by in a blur and you’ll be grateful you wrote it down
- Cards, book, etc. something to entertain yourself around the campsite
- Money to tip porters & guides
- Dry shampoo
- Go Girl – pee funnel to pee into bottle.
- No need to bring makeup.
- Deodorant
- Baby powder to help keep feet dry (optional)
- Sterile needles (Optional – in case you need an injection and don’t trust the hygiene conditions)
- Panty liners to keep underwear cleaner longer (suggested)
- Did you get all your shots needed to enter the country? Visit CDC website
- I brought Just In Case Meds: Ciprofloxacin (traveler’s diarrhea & bladder infection) and Azithromycin (aka Z-pack)
PERSONAL FIRST AID KIT
- Advil – Heard this helps with AMS too. Take 2 every morning and never ached or got sick.
- First-aid kit that includes bandages, tape, blister kit, antibacterial cream, antibiotics for travelers’ diarrhea, antimalarials, antihistamines, cold and flu medications, throat lozenges, and altitude medications.
- Blister kit – with tape, Neosporin and Band-Aids (both regular and blister Band-Aids) use this even as preventative measures.
- PeptoBismol
- Immodium for anti-diarrhea
- Malaria tablets – I took generic Malarone
- Diamox (Acetazolamide)-Used to prevent/combat altitude sickness
PAPERWORK (Use 4L water proof Sea to Summit bag to protect passport, money and valuables)
- Airline ticket
- Passport
- Visa
- Prescriptions
- Yellow fever certificate (if required)
- Proof of travel insurance
- Medical insurance
- Medical Evacuation insurance
Have question(s) ? To clear your doubts, We’re Online Click WHATSAPP chat with us!